一,什么squid
Squid是一个高性能的代理缓存服务器,可以加快内部网浏览Internet的速度,提高客户机的访问命中率。Squid不仅支持HTTP协议,还支持FTP、gopher、SSL和WAIS等协议。和一般的代理缓存软件不同,Squid用一个单独的、非模块化的、I/O驱动的进程来处理所有的客户端请求。
Squid将数据元缓存在内存中,同时也缓存DNS查寻的结果,除此之外,它还支持非模块化的DNS查询,对失败的请求进行消极缓存。Squid支持SSL,支持访问控制。由于使用了ICP,Squid能够实现重叠的代理阵列,从而最大限度的节约带宽。
Squid能够增强访问控制,提高安全性。可以针对特定的的网站、用户、网络、数据类型实施访问控制等
二,安装squid
http://www.squid-cache.org/Versions/v3/3.1
到上面的链接去下载squid,到目前为止,squid3.1.4是最新的。
tar zxvf squid-3.1.4.tar.gz -C  /home/zhangy
cd /home/zhangy/squid-3.1.4
./configure --prefix=/usr/local/squid
make && make install
说明:安装的时候./configure提供很多的参数选择,你可以查看./configure --help来获得,部分如下
--enable-icap-client Enable the ICAP client.
--enable-ecap support loadable content adaptation modules
--enable-useragent-log Enable logging of User-Agent header
--enable-referer-log Enable logging of Referer header
--disable-wccp Disable Web Cache Coordination Protocol
像这个参数,安装的时候不加也没关系,可以通过配置来设置,像这样参数加的不好,安装的时候,还会出问题。
加了很多参数,安装报错
coss/StoreFScoss.cc:1:2: error: #error COSS Support is not stable yet in Squid-3. Please do not use.
make[3]: *** [StoreFScoss.lo] Error 1
make[3]: Leaving directory `/home/zhangy/squid-3.1.4/src/fs'
make[2]: *** [all-recursive] Error 1
make[2]: Leaving directory `/home/zhangy/squid-3.1.4/src'
make[1]: *** [all] Error 2
make[1]: Leaving directory `/home/zhangy/squid-3.1.4/src'
make: *** [all-recursive] Error 1
三,配置squid
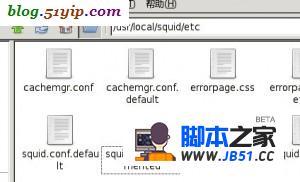
当你装好后,在usr/local/squid/etc文件夹下面会有些文件,squid.conf是squid的配置文件,会产生一个配置文件的备份文件,如下图
你可以把原来的配置文件删除掉,重新建个squid.conf,原配置文件有备份,上图中你可以看到squid.conf.default就是备份文件,squid.conf.documented这个文件,是3.14总的配置文件,有5000多行,你想的什么配置都能在里面找到。我的配置文件
#
# Recommended minimum configuration:
#
acl manager proto cache_object
acl localhost src 127.0.0.1/32
acl localhost src ::1/128
acl to_localhost dst 127.0.0.0/8 0.0.0.0/32
acl to_localhost dst ::1/128

#自带端口设置
acl SSL_ports port 443
#acl Safe_ports port 80		# http
acl Safe_ports port 21		# ftp
acl Safe_ports port 443		# https
acl Safe_ports port 70		# gopher
acl Safe_ports port 210		# wais
acl Safe_ports port 1025-65535	# unregistered ports
acl Safe_ports port 280		# http-mgmt
acl Safe_ports port 488		# gss-http
acl Safe_ports port 591		# filemaker
acl Safe_ports port 777		# multiling http
acl CONNECT method CONNECT

# We recommend you to use at least the following line.
hierarchy_stoplist cgi-bin ?

# Leave coredumps in the first cache dir
coredump_dir /usr/local/squid/var/cachebak

#squid监听9000端口
http_port 9000 accel vhost vport

#设置缓存内存值
cache_mem 128 MB

#设置内存池
memory_pools_limit 50 MB

#装入内存的文件大小
maximum_object_size_in_memory 2048 KB
#允许最小文件请求
minimum_object_size 0 KB
#允许最大文件请求
maximum_object_size 1280 KB

#设置缓存目录大小为256MB 一级目录为16个二级目录为256个
memory_replacement_policy lru
cache_dir ufs /usr/local/squid/var/cache 256 16 256
max_open_disk_fds 0

#日志的格式
emulate_httpd_log on
logformat combined %>a %ui %un [%tl] "%rm %ru HTTP/%rv" %>Hs %h" "%{User-Agent}>h" %Ss:%Sh

#下面是关于日志文件的放置目录与文件名!
access_log /usr/local/squid/var/logs/access.log
cache_log /usr/local/squid/var/logs/cache.log
cache_store_log /usr/local/squid/var/logs/cache_store.log
pid_filename  /usr/local/squid/var/logs/squid.pid

#反向代理
cache_store_log none
cache_peer 192.168.18.2  parent 80  0 no-query no-digest originserver name=www
#192.168.18.2为web的ip地址,80为web监听端口
cache_peer_domain www localhost
cache_peer_access www allow all

#最大连接数为10
acl OverConnLimit maxconn 10
http_access deny OverConnLimit

#防止百度盗链,给他一个无图标识
acl notallow referer_regex -i baidu
http_access deny notallow
deny_info http://51yip.com/noimage.gif notallow

#允许本地管理
http_access allow Manager Localhost
http_access deny Manager
http_access allow all

#哪些不缓存
acl QUERY urlpath_regex cgi-bin .PHP .cgi
cache deny QUERY

cache_swap_low 90
cache_swap_high 95

#用户组和人员
cache_effective_user zhangy
cache_effective_group users
上面的例子,只是实验用的配置,并且没有真正部署的配置
squid3.1系列官方配置说明 http://www.squid-cache.org/Versions/v3/3.1/cfgman/
squid3.0系列官方配置说明 http://www.squid-cache.org/Versions/v3/3.0/cfgman/
squid2.7系列官方配置说明 http://www.squid-cache.org/Versions/v2/2.7/cfgman/
squid2.6系列官方配置说明 http://www.squid-cache.org/Versions/v2/2.6/cfgman/
四,生成cache目录
利用./squid -z来生成目录
cd /usr/local/squid/sbin
./squid -z
说明:如果配置不出问题的话,生成目录不会有问题,你可以用./squid -k parse来测试配置文件
以下是我遇到的问题
FATAL: Can't parse configuration token: '%>a %ui %un [%tl] "%rm %ru HTTP/%rv" %Hs %<st "%{Referer}>h" "%{User-Agent}>h" %Ss:%Sh'

Squid Cache (Version 3.1.4): Terminated abnormally.
cpu Usage: 0.003 seconds = 0.000 user + 0.003 sys
Maximum Resident Size: 12768 KB
Page faults with physical i/o: 1
[zhangy@BlackGhost sbin]# ./squid -z
2010/06/10 22:14:08| WARNING: the "Hs" formating code is deprecated use the ">Hs" instead
2010/06/10 22:14:08| WARNING cache_mem is larger than total disk cache space!
2010/06/10 22:14:08| Creating Swap Directories
2010/06/10 22:14:08| /usr/local/squid/var/cache exists
五,squid启动
./squid
原文链接:/redis/447332.html

