(一)基础环境设置
操作系统版本 :centos-7.4
MongoDB版本:MongoDB 4.2 社区版
(1)关闭防火墙
# 关闭防火墙
[root@mongodbenterprise lib]# systemctl stop firewalld.service


# 禁止firewall开机启动
[root@mongodbenterprise lib]# systemctl disable firewalld.service


# 确认防火墙为not running状态
[root@mongodbenterprise lib]# firewall-cmd --state
 not running
(2)关闭selinux
[root@mongodbenterprise lib]# vim /etc/selinux/config
SELINUX=disabled
(3)安装依赖包
yum install -y libcurl openssl
(二)安装MongoDB
安装路径规划:
安装路径:/opt/mongo-4.2/
数据文件路径:/mongo/data/
错误日志路径:/mongo/log/mongodb.log
配置文件:/mongo/mongodb.conf
(1)下载安装包

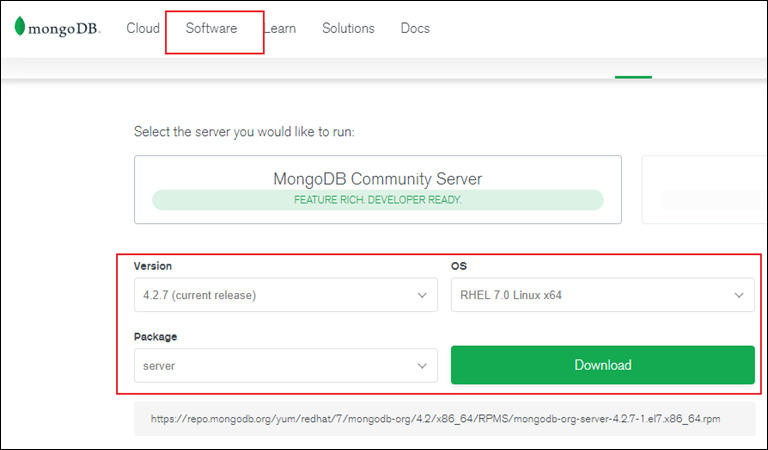
需要注意的是,redhat/centos是类似的Linux系统,可以简单地理解为:centos是redhat的社区版。因此直接下载os为redhat7的tar包即可。
(2)解压安装包
[root@mongoserver ~]# ls
anaconda-ks.cfg  mongodb-linux-x86_64-rhel70-4.2.7.tgz
 [root@mongoserver ~]# tar -xzvf mongodb-linux-x86_64-rhel70-.tgz
 [root@mongoserver ~]#
 anaconda-ks.cfg  mongodb-linux-x86_64-rhel70-7  mongodb-linux-x86_64-rhel70-7.tgz
(3)安装MongoDB
tar包是不需要安装的,解压到安装位置即可,我的安装位置是/opt/mongo-4.2
.tgz
[root@mongoserver ~]# mv mongodb-linux-x86_64-rhel70-7 /opt/
[root@mongoserver ~]# cd /opt
[root@mongoserver opt]#
mongodb-linux-x86_64-rhel70-
[root@mongoserver opt]# 7/ mongodb-4.2
[root@mongoserver opt]#
mongodb-4.2
[root@mongoserver ~]# vim /mongo/mongodb.conf
 # mongod.conf

# for documentation of all options,see:
 #   http://docs.mongodb.org/manual/reference/configuration-options/

# where to write logging data.
 systemLog:
   destination: file
   logAppend: true
   path: /mongo/log/mongodb.log

# Where and how to store data.
 storage:
   dbPath: /mongo/data
   journal:
     enabled:
 #  engine:
 #  wiredTiger:

# how the process runs
 processManagement:
   fork: true  # fork and run in background
   pidFilePath: /mongo/mongod.pid  # location of pidfile
   timeZoneInfo: /usr/share/zoneinfo

# network interfaces
 net:
   port: 27017
   bindIp: 0.0.0.0  # Enter 0.0,:: to bind to all IPv4 and IPv6 addresses or,alternatively,use the net.bindIpAll setting.
创建相关路径:
mkdir -p /mongo/log/
mkdir -p /mongo/data/
(5)将mongo的目录添加到PATH中,以便于操作系统能识别到mongo命令
[root@mongoserver ~]# vim /etc/profile
 # 在文件末尾添加
PATH=$PATH:$HOME/bin:/opt/mongodb-4.2/bin

# 使profile中的参数生效
[root@mongoserver ~]# source /etc/profile
(6)创建运行用户mongod
[root@mongoserver ~]# groupadd mongod
[root@mongoserver ~]# useradd -g mongod mongod

授权:
[root@mongoserver ~]# chown -R mongod:mongod /mongo
(7)运行MongoDB
[root@mongoserver log]# mongod -config /mongo/mongodb.conf
about to fork child process,waiting until server is ready  connections.
forked process: 2137
child process started successfully,parent exiting

# 或下面的方式
mongod -f /mongo/mongodb.conf
(8)查看运行状态
[root@mongoserver log]# ps -ef|grep mongo
 root       2036      1  8 01:03 ?        00:00 mongod -config /mongo/mongodb.conf
 root       2072   1309  0 03 pts/0    00 grep --color=auto mongo
(9)关闭MongoDB
[root@mongoserver log]# mongod --shutdown --config /mongo/mongodb.conf
 killing process with pid: 2082
【完】
原文链接:/mongodb/997616.html
